while connecting RPI0W first time to the network with Ethernet connection by ( 3 Port USB Hub w/ Ethernet: **MMP-0491** )
the RPI0W get an IP address but i cant connect to it by ssh
the solution was so easy and tricky
1- put the SD card to SD card reader and connect it to a computer with OS linux
2- open the folder called boot
3- adding new file named 'ssh' with the single cotation
and reconnect it again it will connect :)
Collection of my articles about raspberry pi & linux & electronics & Embedded systems also.
Thursday, March 30, 2017
Thursday, May 19, 2016
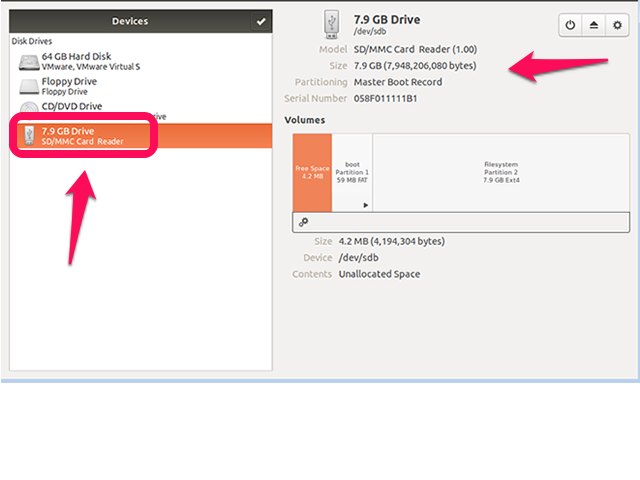
format SD card in ubuntu
while burning raspberry pi image on SDcard via dd command ; the sd card didnt work
so i have to format it and i cant format it ;
i found this method to format it
http://www.ehow.com/how_6080534_format-sd-card-ubuntu.html
so i have to format it and i cant format it ;
i found this method to format it
http://www.ehow.com/how_6080534_format-sd-card-ubuntu.html
Friday, October 9, 2015
RPi fan for heat and temperature
with using fans the temp. of each lose around 10°C .
RPi b+
you can view live temperature results from this link http://rpi88.ddns.net/onoff.log if the file is still there.
![]() |
| temp. before using fan |
![]() |
| temp. after using fan for cooling |
you can view live temperature results from this link http://rpi22.ddns.net/onoff.log if the file is still there.
![]() |
| temp. before using fan |
![]() |
| temp. after using fan for cooling |
Note 2 : for RPi B+ the fan is connected directly to another charger because the source was not enough for the fan and RPi .
Note 3 : the RPi2 temperature is more than RPiB+ cause the freq. of the first is more than the 2nd.
Note 4 : further i will control the fan speed from the mentioned circuit .
the circuit will be tested and reported .
Friday, October 2, 2015
Authentication Management
How To Monitor System Authentication Logs on Ubuntu
How To Monitor System Logins
A fundamental component of authentication management is monitoring the system after you have configured your users.
Luckily, modern Linux systems log all authentication attempts in a discrete file. This is located at "/var/log/auth.log":
The Secure Shell (SSH) Protocol by default uses port 22. Accepting this value does not make your system insecure, nor will changing the port provide a significant variance in security. However, changing the default SSH port will stop many automated attacks and a bit harder to guess which port SSH is accessible from. In other words, a little security though obscurity.
Before getting started, we suggest you Learn Linux Basics and follow these precautions.
Steps to follow
Step 1
As root, use your favorite text editor (nano) to edit the sshd configuration file.
nano /etc/ssh/sshd_config
Step 2
Edit the line which states 'Port 22'. But before doing so, you'll want to read the note below. Choose an appropriate port, also making sure it not currently used on the system.
# What ports, IPs and protocols we listen for
Port 50683
Note: The Internet Assigned Numbers Authority (IANA) is responsible for the global coordination of the DNS Root, IP addressing, and other Internet protocol resources. It is good practice to follow their port assignment guidelines. Having said that, port numbers are divided into three ranges: Well Known Ports, Registered Ports, and Dynamic and/or Private Ports. The Well Known Ports are those from 0 through 1023 and SHOULD NOT be used. Registered Ports are those from 1024 through 49151 should also be avoided too. Dynamic and/or Private Ports are those from 49152 through 65535 and can be used. Though nothing is stopping you from using reserved port numbers, our suggestion may help avoid technical issues with port allocation in the future.
Step 3
Switch over to the new port by restarting SSH.
/etc/init.d/ssh restart
Step 4
Verify SSH is listening on the new port by connecting to it. Note how the port number now needs to be declared.
ssh username@hostname.com -p 50683
A fundamental component of authentication management is monitoring the system after you have configured your users.
Luckily, modern Linux systems log all authentication attempts in a discrete file. This is located at "/var/log/auth.log":
sudo less /var/log/auth.log
How To Use the "last" Command
Usually, you will only be interested in the most recent login attempts. You can see these with the "last" tool:
This gives a formated version of the "/etc/log/wtmp" file.
last
As you can see, in the first and third line, it shows that the user is still logged into the system. Otherwise, the total time logged into the system during a session is given by a set of hyphen-separated values.
How To Use the "lastlog" Command
If you would like to look at this situation from a different angle, you can view the last time each user on the system logged in.
This information is provided by accessing the "/etc/log/lastlog" file. It is then sorted according to the entries in the "/etc/passwd" file:
lastlog
You can see the latest login time of every user on the system.
Notice how the system users will almost all have "**Never logged in**". We saw earlier how these accounts do not have password authentication set up, so this is the expected value.
-=-=-=-=-=-=-=-=-=-=-=-=-=-=-=-=-=-=-=-=-=-=-=-=-=-=-=-=-=-=-=-=-=-=-=-=-
Change the default SSH port
In this How-To we're going to walk you though changing the default SSH port on a Linux system.
The Secure Shell (SSH) Protocol by default uses port 22. Accepting this value does not make your system insecure, nor will changing the port provide a significant variance in security. However, changing the default SSH port will stop many automated attacks and a bit harder to guess which port SSH is accessible from. In other words, a little security though obscurity.
Before getting started, we suggest you Learn Linux Basics and follow these precautions.
Steps to follow
Step 1
As root, use your favorite text editor (nano) to edit the sshd configuration file.
nano /etc/ssh/sshd_config
Step 2
Edit the line which states 'Port 22'. But before doing so, you'll want to read the note below. Choose an appropriate port, also making sure it not currently used on the system.
# What ports, IPs and protocols we listen for
Port 50683
Note: The Internet Assigned Numbers Authority (IANA) is responsible for the global coordination of the DNS Root, IP addressing, and other Internet protocol resources. It is good practice to follow their port assignment guidelines. Having said that, port numbers are divided into three ranges: Well Known Ports, Registered Ports, and Dynamic and/or Private Ports. The Well Known Ports are those from 0 through 1023 and SHOULD NOT be used. Registered Ports are those from 1024 through 49151 should also be avoided too. Dynamic and/or Private Ports are those from 49152 through 65535 and can be used. Though nothing is stopping you from using reserved port numbers, our suggestion may help avoid technical issues with port allocation in the future.
Step 3
Switch over to the new port by restarting SSH.
/etc/init.d/ssh restart
Step 4
Verify SSH is listening on the new port by connecting to it. Note how the port number now needs to be declared.
ssh username@hostname.com -p 50683
-=-=-=-=-=-=-=-=-=-=-=-=-=-=-=-=-=-=-=-=-=-=-=-=-=-=-=-=-=-=-=-=-=-=-=-=-
Friday, September 18, 2015
run program at start-up and at shut-down
I had found this page very important to whom interest start-up services and shut-down,
http://www.stuffaboutcode.com/2012/06/raspberry-pi-run-program-at-start-up.html
There are loads of ways of running a command at start-up in Linux but my favoured approach is to create an initialisation script in /etc/init.d and register it using update-rc.d. This way the application is started and stopped automatically when the system boots / shutdowns.
Create script in /etc/init.d
Make script executable
Test starting the program
Test stopping the program
Register script to be run at start-up
To register your script to be run at start-up and shutdown, run the following command:
Note - The header at the start is to make the script LSB compliant and provides details about the start up script and you should only need to change the name. If you want to know more about creating LSB scripts for managing services, see http://wiki.debian.org/LSBInitScripts
If you ever want to remove the script from start-up, run the following command:
so i done mine to test the RPi start up and Shut down
here the included codes
http://www.stuffaboutcode.com/2012/06/raspberry-pi-run-program-at-start-up.html
There are loads of ways of running a command at start-up in Linux but my favoured approach is to create an initialisation script in /etc/init.d and register it using update-rc.d. This way the application is started and stopped automatically when the system boots / shutdowns.
Create script in /etc/init.d
sudo nano /etc/init.d/NameOfYourScript
The following is an example based on starting up the no-ip service [/usr/local/bin/noip], but change the name of the script and the command to start and stop it and it would work for any command.
#! /bin/sh
# /etc/init.d/noip
### BEGIN INIT INFO
# Provides: noip
# Required-Start: $remote_fs $syslog
# Required-Stop: $remote_fs $syslog
# Default-Start: 2 3 4 5
# Default-Stop: 0 1 6
# Short-Description: Simple script to start a program at boot
# Description: A simple script from www.stuffaboutcode.comwhich will start / stop a program a boot / shutdown.
### END INIT INFO
# If you want a command to always run, put it here
# Carry out specific functions when asked to by the system
case "$1" in
start)
echo "Starting noip"
# run application you want to start
/usr/local/bin/noip2
;;
stop)
echo "Stopping noip"
# kill application you want to stop
killall noip2
;;
*)
echo "Usage: /etc/init.d/noip {start|stop}"
exit 1
;;
esac
exit 0
Warning - its important you test your script first and make sure it doesn't need a user to provide a response, press "y" or similar, because you may find it hangs the raspberry pi on boot waiting for a user (who's not there) to do something!# /etc/init.d/noip
### BEGIN INIT INFO
# Provides: noip
# Required-Start: $remote_fs $syslog
# Required-Stop: $remote_fs $syslog
# Default-Start: 2 3 4 5
# Default-Stop: 0 1 6
# Short-Description: Simple script to start a program at boot
# Description: A simple script from www.stuffaboutcode.comwhich will start / stop a program a boot / shutdown.
### END INIT INFO
# If you want a command to always run, put it here
# Carry out specific functions when asked to by the system
case "$1" in
start)
echo "Starting noip"
# run application you want to start
/usr/local/bin/noip2
;;
stop)
echo "Stopping noip"
# kill application you want to stop
killall noip2
;;
*)
echo "Usage: /etc/init.d/noip {start|stop}"
exit 1
;;
esac
exit 0
Make script executable
sudo chmod 755 /etc/init.d/NameOfYourScript
Test starting the program
sudo /etc/init.d/NameOfYourScript start
Test stopping the program
sudo /etc/init.d/NameOfYourScript stop
Register script to be run at start-up
To register your script to be run at start-up and shutdown, run the following command:
sudo update-rc.d NameOfYourScript defaults
Note - The header at the start is to make the script LSB compliant and provides details about the start up script and you should only need to change the name. If you want to know more about creating LSB scripts for managing services, see http://wiki.debian.org/LSBInitScripts
If you ever want to remove the script from start-up, run the following command:
sudo update-rc.d -f NameOfYourScript remove
----------------------------------------------------------
and here is the code
also i faced a problem with DNS so i forced it to update it not to be overwrite from another script
here the included codes
Friday, August 28, 2015
using NOIP website as DNS instead of Global IP [updated]
Remote Access with Dynamic DNS The freedom to connect to your devices from anywhere. easy to install easy to use .
here is how to install it and configure it .
https://www.noip.com/support/knowledgebase/getting-started-with-no-ip-com/
But for getting the full feature of connecting to (SSH , VNC , HTTP ,....) i used this specific sitting
and in the programs instead of using the global IP , i used this hostname (rpi22.ddns.net) even the program is browser or SSH connector or remote VNC .
-=-=-=-=-=-=-=-=-=-=-=-
After restarting the RPi the NOIP didn't run , so i contacted NOIP site, and the sent to me this perfect site :
http://www.stuffaboutcode.com/2012/06/raspberry-pi-run-program-at-start-up.html
it solves the problem
----------------------------------------------------------------------------------------------
i faced problem while installing NoIP on RPi B+
and here the solution from the site support
You will be able to install No-IP.com's DUC on Raspberry Pi in just a few minutes with Terminal. Installing the service is simple to do, and requires little knowledge of Linux.
You will first need to create a directory for the client software to be installed into. You can do so by following the steps below.
Open "Terminal" and type the following, after each entry you will press Enter.
mkdir /home/pi/noip
cd /home/pi/noip
2. After creating the folders for the DUC you will need to download the software,
Within the terminal window you will need to type the following, after each entry you will press Enter.
wget http://www.no-ip.com/client/linux/noip-duc-linux.tar.gz
tar vzxf noip-duc-linux.tar.gz
3. You will then need to navigate to the directory where the files have been downloaded.
cd noip-2.1.9-1
4. It is time to install the program
sudo make
sudo make install
After typing "sudo make install" You will be prompted to login with your No-IP.com account username and password.
After logging into the DUC, it will tell you how many hostnames you have registered with your account. Simply answer the questions to proceed. When asked how often you want the update to happen you must choose 5 or more. The interval is listed in minutes, if you choose 5 the update interval will be 5 minutes. If you choose 30 the interval will be 30 minutes.
To confirm that the service is working properly you can run the following command,
sudo noip2 -S (Capital "S")
http://www.stuffaboutcode.com/2012/06/raspberry-pi-access-from-internet-using.html
connecting to RPi threw the internet (router sitting)
first of all turn of the firewall of the router and also the SPI
Second join and connect the ports that you want (SSH , HTTP , VNC , ....) between the global network and the internal IP of the RPi
----------------
i tested the connection from my mobile using the Data (4G network)
i tested (SSH , HTTP , VNC ) and succeeded
Monday, August 24, 2015
turning off the Raspberry pi leds
http://raspberrypi.stackexchange.com/questions/697/how-do-i-control-the-system-leds-using-my-software
Friday, July 3, 2015
List of usefull command line (updated)
* Last reboot time
last reboot;
last reboot;
* Searching command
greb filename;
greb filename;
* Searching for file in the computer
tree -fa | grep filename;
* Real internet ip
curl ifconfig.me;
curl icanhazip.com;
* Real-time view of a running system.
top
http://www.tecmint.com/12-top-command-examples-in-linux/
* vcgencmd
vcgencmd measure_temp vcgencmd measure_clock arm* Real-time view of a running system.
top
http://www.tecmint.com/12-top-command-examples-in-linux/
* vcgencmd
vcgencmd measure_volts core
http://elinux.org/RPI_vcgencmd_usage
http://www.maketecheasier.com/finding-raspberry-pi-system-information/
*Change mode of file
chmod u=rwx,g=rx,o=r myfile
*testing PHP file
php -f filename.php
*php information function
<?php phpinfo();
php -f filename.php
*php information function
<?php phpinfo();
*The sudo command can be used to obtain the privileges of other users too. I've installed the Apache web server, and the user www-data is automatically created during this process. If I want to edit a file using www-data's permissions, I can use the -u option:
sudo -u www-data nano /var/www/somefile.txt
Best global ip address detecting commands
try one of this commands to obtain your global ip address in linux OS
curl ifconfig.me
curl icanhazip.com
DNS problem after static ip (solved) (updated)
After i changed my ip from dynamic to static
i had found that the Rpi is connected well with local network
but cant connect to internet
the solution of this problem is in these few lines
since i had found that after restart connection with Rpi these configuration lost
i forced the raspy to add these lines every startup and reboot by adding these two lines to the file rc.local before exit 0
source of solution is from here
http://www.suntimebox.com/raspberry-pi-tutorial-course/week-3/day-5/
this site is very wander full for whom are beginners in linux or raspberry pi
i had found that the Rpi is connected well with local network
but cant connect to internet
the solution of this problem is in these few lines
One last thing that needs to be modified is the /etc/resolv.conf file. This file contains information of DNS name resolvers that allow your raspberry pi to resolve names to IP addresses. For example, if you ping www.suntimebox.com the raspberry pi will have to determine the IP address of www.suntimebox.com.
Enter the following command to edit the resolv.conf file.
sudo nano /etc/resolv.conf
Enter the follow Google public dns server IP address.
nameserver 8.8.8.8
name server 8.8.4.4
name server 8.8.4.4
Press CTRL-X to exit but remember to save the file by accepting the changes.
since i had found that after restart connection with Rpi these configuration lost
i forced the raspy to add these lines every startup and reboot by adding these two lines to the file rc.local before exit 0
sudo nano /etc/rc.local
then adding these two lines before exit 0
echo 'nameserver 8.8.8.8' >> /etc/resolv.conf;
echo 'name server 8.8.4.4' >> /etc/resolv.conf;
to be the final view of rc.local file
source of solution is from here
http://www.suntimebox.com/raspberry-pi-tutorial-course/week-3/day-5/
this site is very wander full for whom are beginners in linux or raspberry pi
Powering Rpi with power bank (updated)
Now i had buy new power bank (InnJoo E1 10000mAh Powerbank) with specs ( Capacity: 10000mAh - Input: 5V/1A - Output: 5V/2A );
when i full charged it , it can power on the Rpi connected to wifi dongle
but i want to test how much time it will survive it
so i used this code to save the run time and save time every 30 sec
while :; do date >> time_servive_test.txt; sleep 30; done
when i open the file "time_servive_test.txt" it will have a saving if time every 30 sec
so to know if it works will you can use this command line to count the numbers of test executed
wc -l time_servive_test.txt
i will publish the result of my test :) soon (inshaa Allah)
------------
i had updated the code to be interval every 1 minuet
also i had added a chick for global ip address
echo 'start saving time';
echo '' > time_servive_test.txt;
while :;
do
date >> time_servive_test.txt;
curl icanhazip.com; >> time_servive_test.txt;
sleep 60;
done
-------------------------------------------------------------------------
finally the test had been finished
the power-bank of 10000 mAh survived the Raspberry pi for more than 11 hours (around 12 or more).
when i used the command sudo shutdown -h now the raspy shutdown and the power disconnected , when i pressed the power of the power-bank the raspy powered on
finally the test had been finished
the power-bank of 10000 mAh survived the Raspberry pi for more than 11 hours (around 12 or more).
when i used the command sudo shutdown -h now the raspy shutdown and the power disconnected , when i pressed the power of the power-bank the raspy powered on
Static WIFI address
How to use Rpi with wifi dongle and access it with fixed ip
the coming steps will lead to full control of the Rpi with wifi
first of all you have to connect to Rpi via cable connected to the local Router (disconnect the wifi dongle ) and find its ip address to connect it via SSH . (these easy steps will be discussed later)
secondly after connection and opening SSH connection
go to /etc/network/interfaces via this command
you will find these lines as image
change manual to static
then add these lines and configure them according to your network settings
copy this Template to the file and add wifi name instead of "wifi_name" and wifi password instead of "wifi_password"
press Ctrl+x then Enter to save the file and exit from nano editor
then reboot the Rpi to active these settings you can use this line to reboot successfully
for any questions don't hesitate to ask to seek for answer together .
---------------------
hint : i still have problem with global connection with the Rpi with static ip
the problem is with DNS put iam seeking for solution and i will publish it "Inshaa Allah".
the coming steps will lead to full control of the Rpi with wifi
first of all you have to connect to Rpi via cable connected to the local Router (disconnect the wifi dongle ) and find its ip address to connect it via SSH . (these easy steps will be discussed later)
secondly after connection and opening SSH connection
go to /etc/network/interfaces via this command
sudo nano /etc/network/interfaces
you will find these lines as image
change manual to static
then add these lines and configure them according to your network settings
allow-hotplug wlan0
auto wlan0
iface wlan0 inet static
address 192.168.1.22
netmask 255.255.255.0
gateway 192.168.1.1
don't forget to put your own wanted ip instead of 192.168.1.22
the final look of the file /etc/network/interfaces will be
press Ctrl+x then Enter to save the file and exit from nano editor
now you have to enter the data of wifi name (ssid) and password
go to /etc/wpa_supplicant/wpa_supplicant.confsudo nano /etc/wpa_supplicant/wpa_supplicant.conf
copy this Template to the file and add wifi name instead of "wifi_name" and wifi password instead of "wifi_password"
network={
ssid="wifi_name"
psk="wifi_password"
key_mgmt=WPA-PSK
}
press Ctrl+x then Enter to save the file and exit from nano editorthen reboot the Rpi to active these settings you can use this line to reboot successfully
sudo reboot ; exit
for any questions don't hesitate to ask to seek for answer together .
---------------------
Tuesday, June 16, 2015
Beginning and Start
بسم الله الرحمن الرحيم
بإذن الله هتكون دي بداية لتدوين و تسجيل مواضيعي و مجمل خبراتي في مجال الإليكترونيات و الأنظمة المدمحة
أسال الله التوفيق و السداد و أن ينفع بها

هذا المُصنَّف بواسطة محمد صبحي مرخص بموجب ترخيص المشاع الإبداعي نَسب المُصنَّف - غير تجاري - الترخيص بالمثل 4.0 دولي.
-=-=-=-=-=-=-
In the name of God, the Most Gracious, the Most Merciful,if Allah wills its a start of documentation for my technical articles and experience in electronic field and embedded systems.
Asking Allah for Success and Achievement and be helpful.

RPi-Soubhi by Mohamed Soubhi is licensed under a Creative Commons Attribution-NonCommercial-ShareAlike 4.0 International License.
Subscribe to:
Posts (Atom)